Behind the Scenes: How I Handcraft My Wind Chime
People often ask me how I make my wind chimes. The short answer? With patience, purpose, and years of experience working with clay and as an artist. But really—it’s more than that. For me, creating is an outlet and a way of life. It’s how I process the world, find stillness, and bring something meaningful to life with my hands.
Every wind chime available at The Craft Wind Chimes was thoughtfully handcrafted—from shaping and carving to firing and final assembly, resulting in a truly unique ceramic wind chime with its own tone, texture, and personality. These aren't just decorative pieces—they're functional works of art designed to bring beauty and calm to your indoor or outdoor space.
Take a peek behind the scenes and see the care, creativity, and artisan craftsmanship that goes into every piece.
Take a peek into snippets of the process, here
It All Starts With the Clay
I work with three main clay bodies: Hawaiian Red, Speckled Buff, and White B-Mix. Each one behaves a little differently and brings its own aesthetic to the finished wind chime.
- Red and buff clays offer an earthy, rustic look—perfect for natural, industrial, or farmhouse-style decor.
- White clay is smooth and refined, lending itself to clean, elegant, and minimalist designs.

Once the clay is properly wedged to remove any air bubbles, I place it into my wall-mounted extruder. As I turn the wheel by hand, the clay is slowly pressed through a custom oval-shaped die at the base—a shape that has become a signature element in my wind chime designs. Each block of clay yields about 14 to 16 bells. I cut them one by one as they emerge, then stand each piece upright on a board to begin the slow drying process.
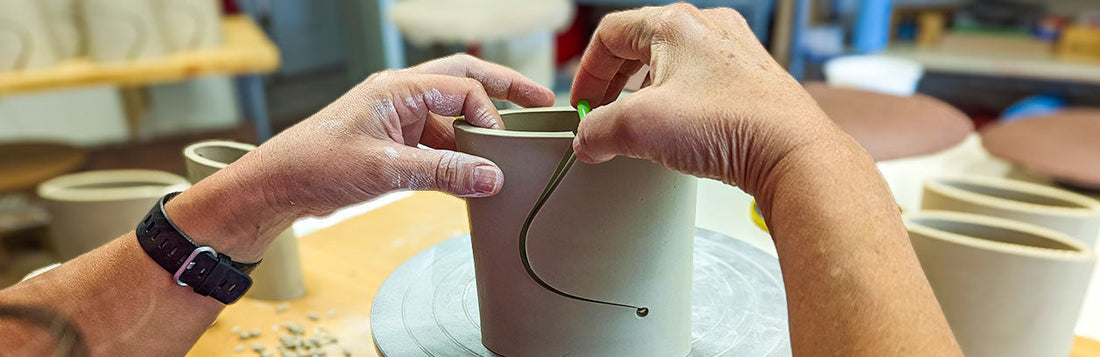
Listening to the Clay
There’s a perfect moment when clay is firm enough to carve but still moist enough to shape. That’s when the first round of cleanup begins—smoothing away rough edges and making sure the form has held its shape. Then I move on to cutting the sound holes, forming the side openings for hanging, and stamping my logo onto the side of each bell.

The shape of the sound holes isn't just for good looks—it plays an essential role in the tone of each wind chime. Much like the f-holes on violins and cellos, these openings are carefully designed to influence how sound resonates and projects. Even slight variations in size or placement can shift the bell’s voice. Some chimes resonate with deep, mellow tones, while others ring a bit more bright and clear. The composition of the clay body also affects the sound, adding another layer of uniqueness. And since each bell is shaped and carved by hand, no two ever look or sound alike.

Firing (and Re-Firing)
After shaping and carving, the bells dry slowly for 24–48 hours before their first kiln firing. The red and speckled buff chimes go through a two-step firing process:
- Bisque firing to harden the clay.
- Iron oxide staining

For the speckled buff chimes, I aim for a streaked, variegated finish that brings depth and warmth. The staining alone can take up to two hours for just one batch—but the rich, rustic finish is always worth it.
White clay bells require only one firing and retain their clean, modern aesthetic without any stains. My black sgraffito bells also go through a single firing—but the intricate carving process makes them among the most time-intensive pieces I create.
The Heartbeat of the Bell: The Clapper

The clapper—the part that strikes the bell with the help of a passing breeze to create its sound—is both functional and decorative. I begin by pressing the clay through a slab roller to achieve the ideal thickness—thin enough to move freely in the wind, but strong enough to resist breaking. Then, using a circular die, I cut out each shape before refining and smoothing the edges by hand. Some clappers are then:
- Secured on the pottery wheel to carve out a spiral design
- Finished with a rich black underglaze then detailed using the sgraffito technique
- Accented with iron oxide for a rustic feel
- Sealed with a ceramic glaze that creates an organic speckle pattern
The Art of Sgraffito
My Sgraffito bells require a steady hand, clear mind, and patience. Each design is carved directly into the surface of the clay while it's still leather-hard, using special tools to etch through a triple layer of black underglaze to reveal the raw clay beneath. Most designs are drawn freehand and without the use of stencils—which means there’s no room for error. One slip, and the entire piece could be lost. It's a meditative process that can feel both nerve-wracking but also rewarding.

Because the carved surface is the highlight of the piece, I place the sound holes on the sides of these bells. It’s a small adjustment, but one that preserves the integrity of the form, function, and overall aesthetic.

As mentioned previously, these bells do take significantly longer to complete than my standard designs, but the result is worth every minute. They're not just wind chimes—they’re visual and auditory sculptures, each with a voice and personality as distinct as the carving itself.
Made Just for You
Each wind chime is made to order and assembled by hand. After you select your clay body and clapper design, metallic accent beads are added for a hint of modern elegance, and a durable hanging wire is secured—bringing together form, function, and a touch of quiet beauty, ready to catch the breeze. Once complete, your chime is carefully packaged for its journey—whether it’s a sympathy gift, a housewarming present, or a personal keepsake.

More Than Just a Sound
At The Craft Wind Chimes, I don’t just make bells—I make intentional, handcrafted decor designed to bring calm, beauty, and presence into your space. Whether you're buying a wind chime in memory of a loved one or just treating yourself, I hope you can hear the love and care in every ring.